- Java 83.2%
- PLpgSQL 10.8%
- Shell 4%
- Python 1.5%
- Makefile 0.3%
- Other 0.2%
 bd58b7fedb
Co-authored-by: Michael Hoennig <michael@hoennig.de> Reviewed-on: https://dev.hostsharing.net/hostsharing/hs.hsadmin.ng/pulls/293 |
||
|---|---|---|
| .aiassistant/rules | ||
| .claude | ||
| .junie | ||
| .run | ||
| buildSrc | ||
| config/pmd | ||
| doc | ||
| etc | ||
| gradle/wrapper | ||
| Jenkins | ||
| sql | ||
| src | ||
| tools | ||
| .aliases | ||
| .editorconfig | ||
| .envrc | ||
| .gitattributes | ||
| .gitignore | ||
| .gittally.yml | ||
| .tc-environment | ||
| .unset-environment | ||
| AGENTS.md | ||
| build.gradle.kts | ||
| CLAUDE.md | ||
| CONVENTIONS.md | ||
| Dockerfile | ||
| gradle.properties | ||
| gradlew | ||
| gradlew.bat | ||
| LICENSE.md | ||
| lombok.config | ||
| README.md | ||
| settings.gradle | ||
hsadminNg Development
(The origin repository for this project can be found at Hostsharing eG.)
This document gives an overview of the development environment and tools.
For architecture consider the files in the doc and adr folder.
- Setting up the Development Environment
- Running the SQL files
- Biggest Flaws in our Architecture
- How To ...
- How to Run the Application With Other Profiles, e.g. production
- How to Do a Clean Run of the Application
- How to Configure .pgpass for the Default PostgreSQL Database?
- How to Run the Tests Against a Local User-Space Podman Daemon?
- How to Run the Tests Against a Remote Podman or Docker Daemon?
- How to Run the Application on a Different Port?
- How to Use a Persistent Database for Integration Tests?
- How to Generate Demo Data?
- How to Amend Liquibase SQL Changesets?
- How to Re-Generate Spring-Controller-Interfaces from OpenAPI specs?
- How to Generate Database Table Diagrams?
- How to Add (Real) Admin Users
- Further Documentation
Setting up the Development Environment
All instructions assume that you're using a current Linux operating system. The build (including automated tests) was last tested on Ubuntu Linux 24.04 and Linux Mint 22.3.
Builds on MacOS are not officially supported anymore. If you're a MacOS user, you're welcome to contribute to support MacOS again.
To be able to build and run the Java Spring Boot application, you need the following tools:
- Docker 28.x or Podman
- A Java Runtime Environment (JRE) compatible with Java 17 to run gradle.
- The matching Java JDK at will be automatically installed by Gradle toolchain support to
~/.gradle/jdks/.
- The matching Java JDK at will be automatically installed by Gradle toolchain support to
- The Linux bind9 utils (e.g. package bind9-utils) to support DNS checks in the booking+hosting modules.
- Some Gradle like to generate PDF-files for documentation, require more tooling, see Dockerfile.
Optionally, the following tools are suggested:
- PostgreSQL Server 17.7-trixie, if you want to use the database directly, not just via Docker. (see instructions below to install and run in Docker)
- An IDE (e.g. IntelliJ IDEA or Eclipse or VS Code with STS) and a GUI frontend for PostgreSQL like Postbird.
- IntelliJ IDEA Ultimate contains a great SQL GUI frontend, and for its Community edition, there is a community plugin.
- Python 3 on your
PATHif you want to run the Python tools such ashowto,fixmesandpr-quick-check(seetools/howto,tools/fixmesandtools/pr-quick-check) - GnuPG (
gpg) in yourPATHto store encrypted API-keys with theAPIKEYtool.
Tip: A minimal, reproducible build environment containing exactly these prerequisites is defined under
etc/local-reference-build-env. It runs a build (or the full Testcontainers test suite) in a container that matches the documented setup — handy to check whether a build relies on anything undocumented. Seemake -f etc/local-reference-build-env/Makefile help. It's meant to test tool-requirements, not to offer all features for all tools. And of course, this needsmakeand a Docker-deamon as prerequisites.
We also suggest to install direnv, but it is optional.
Each time you change into this directory, direnv reads the .envrc file
(after a one-time direnv allow).
This puts the tools directory on your PATH and sources .aliases automatically,
so you can skip the manual source .aliases step below.
If you have at least Docker and the Java JDK installed in appropriate versions and in your PATH, then you can start like this:
cd your-hsadmin-ng-directory

# set your Docker host, this might need to be amended to your system conf
export DOCKER_HOST=unix:///var/run/docker.sock

source .aliases     # creates some comfortable bash aliases, e.g. 'gw'='./gradlew'
gw                  # initially downloads the configured Gradle version into the project

gw test             # compiles and runs unit- and integration-tests - takes >10min even on a fast machine
                    # `gw test` does NOT run import- and scenario-tests.
                    # You can use `gw-test` instead use .tc-environment, if you've tinkered with your env.
                    # `gw-test` also starts separate runs for groups of tests to avoid PostgreSQL connection problems.
gw scenarioTest     # compiles and scenario-tests - takes ~1min on a decent machine
                    # You can use `gw-test scenarioTest` for same reasons as mentioned above.

howto test          # shows more test information about how to run tests

# if the container has not been built yet, run this:
pg-sql-run          # downloads + runs PostgreSQL in a Docker container on localhost:5432

# if the container has been built already and you want to keep the data, run this:
pg-sql-start
Next, compile and run the application with in dev-mode with all modules, test-data and fake-JWT-authentication usind the gw-bootRun alias:
# on `localhost:8080` and the management server on `localhost:8081`:
gw-bootRun

# you can also pass optional arguments:
gw-bootRun 8888 # will set the management port to 8888+1 = 8889
gw-bootRun 8888 9999 # with explicit management port 9999
At the beginning of the output, you'll see the full ./gradlew-call like this:
+ ./gradlew bootRun '--args=--spring.profiles.active=dev,fake-jwt,complete,test-data --server.port=8080 --management.server.port=8081'
The meaning of the listed profiles is:
- dev: the PostgreSQL users are created via Liquibase
- fake-jwt: the app starts with a built-in fake OIDC provider (login form, authorization-code flow with PKCE, password grant), which accepts any credentials
- complete: all modules (rbac, office, account, hosting) are started
- test-data: some test data gets inserted at startup
Now we can access the REST API, e.g. using curl. But you need to use JWT authentication.
To make this a bit easier to handle, we use the HTTP function from .aliases
(a wrapper around curl), which prefixes $HSADMINNG_API_BASE_URL to the given path
and implicitly adds the Authorization header from $HSADMINNG_JWT_BEARER.
Make sure you replace 8080 with the port you used to run the application.
# the following command does not need authentication and should reply with "pinged ...".
curl http://localhost:8080/api/ping

# but when you try endpoints which need authentication, you will get a 401 error:
curl http://localhost:8080/api/rbac/subjects

# For the following commands we need to be authenticated by a valid JWT token.
# The built-in fake OAuth2/JWT server (profile `fake-jwt`) issues a token for
# any username via a simple password grant (the password is not even checked).
# With HSADMINNG_JWT_TOKEN_URL pointing to its token endpoint (as already set
# by `.tc-environment`), the LOGIN function fetches the Bearer token via that
# grant and exports it as HSADMINNG_JWT_BEARER:
export HSADMINNG_JWT_TOKEN_URL=http://localhost:8080/fake-jwt/token
LOGIN hsh-alex_superuser    # asks for a password, any input works here

# and let the HTTP function know where the API is:
export HSADMINNG_API_BASE_URL=http://localhost:8080

# now, the following command should reply with "ponged ... hsh-alex_superuser":
HTTP GET /api/pong

# the following command should return a JSON array with all customers from the test-data:
HTTP GET /api/test/customers

# the following command should return a JSON array with just the packages
# visible for the admin of the customer yyy, by assuming that role for this request:
HTTP GET /api/test/packages -H 'Hostsharing-Assumed-Roles: rbactest.customer#yyy:ADMIN'

# add a new customer (this is a test-area, not to confuse with a Hostsharing partner);
# for POST/PUT/PATCH, HTTP defaults `-H 'Content-Type: application/json' --data-binary @-`,
# so a JSON body can just be piped in via a here-document:
HTTP POST /api/test/customers <<EOF
{ "prefix":"ttt", "reference":80001, "adminUserName":"admin@ttt.example.com" }
EOF
If you wonder who 'hsh-alex_superuser' and 'hsh-fran_superuser' are and where the data comes from: Alex and Fran are just example global admin accounts as part of the example data which is automatically inserted in Testcontainers and Development environments. Also, for example, try 'admin@xxx.example.com' or 'unknown@example.org'.
JSON responses are pretty-printed automatically, if jq is installed.
And to see the full, currently implemented, API, open http://localhost:8080/swagger-ui/index.html.
To quickly verify if this tooling (bootRun, fake-jwt, LOGIN, HTTP) works on your machine,
run tools/smoke-test (also available as the Gradle task smokeTest):
it runs the application against a throw-away Docker-PostgreSQL
on separate ports (neither the normal local database nor a running local application
instance is affected) and exercises the endpoints above as well as the tooling scripts
tools/create-accounts-from-csv and tools/create-api-key-for-keycloak-sync;
exit code 0 means all PASSED.
HOWTO: Run the application with a real (OAuth2) JWT-authentication, e.g. Keycloak OIDC
If you want to run the application with real (OAuth2) JWT-authentication:
# set the JWT-issuer URI (mandatory, the application refuses to start without it,
# so that the issuer "iss" claim of every JWT is validated), e.g.
export HSADMINNG_JWT_ISSUER=https://login.hshsngdev.hs-example.de/realms/HSAdminDEV

# as well as the JWT token endpoint URI:
export HSADMINNG_JWT_TOKEN_URL=https://login.hshsngdev.hs-example.de/realms/HSAdminDEV/protocol/openid-connect/token

# optionally, restrict accepted JWTs to given audience(s) ("aud" claim, comma-separated), e.g.
export HSADMINNG_JWT_AUDIENCE=hsadmin-ng-api

# run the application against the specified JWT authenticator, do NOT add the 'fake-jwt' profile:
gw bootRun --args='--spring.profiles.active=dev,complete,test-data'
To authenticate, use these functions from .aliases:
LOGIN some-username   # asks for the password, then logs in as that user
LOGIN                 # logs in again with the last given username+password
APIKEY some-key-name  # uses an API-key instead of a JWT, see HOWTO below

export HSADMINNG_API_BASE_URL=http://localhost:8080
HTTP GET /api/hs/accounts/current
Run LOGIN --help for usage, or APIKEY --help for details.
See also HOWTO: Authenticate with an API-Key instead of a Keycloak JWT
By default, tools/jwt-login logs in at the Keycloak behind https://testui.ng.hostsharing.net/;
for another environment, override HSADMINNG_KEYCLOAK_ISSUER, HSADMINNG_KEYCLOAK_CLIENT_ID,
and HSADMINNG_KEYCLOAK_REDIRECT_URI accordingly (see tools/jwt-login for details).
Beware: If HSADMINNG_JWT_TOKEN_URL is set (e.g. from .tc-environment for the fake-jwt server,
see above), LOGIN uses the direct password grant against that token endpoint instead of the
Keycloak login-form flow; unset HSADMINNG_JWT_TOKEN_URL to log in via the Keycloak login form.
HOWTO: Authenticate with an API-Key instead of a Keycloak JWT
API_KEY subjects authenticate technical clients via the Hostsharing-Api-Key HTTP header
instead of a Keycloak OIDC JWT, completely bypassing Keycloak. Their authorization is
determined by whatever RBAC roles got granted to them, like for any other subject.
Bootstrapping the provisioning API-key
With a new or restored legacy database there is no global-admin subject yet,
so nobody could create the first API-key via the API.
Configuring the SHA-256 hash of a provisioning key makes the application provision the API_KEY
subject hsadminng.provisioning.key with the global ADMIN role on start.
This is idempotent: an already stored API-key always takes precedence, thus
further application starts never change it, not even if the configured hash differs.
On the deployed backend server, use tools/remote backend provision-api-key — it performs all
the steps at once: it generates the API-key locally, configures just its hash in the
EnvironmentFile of the backend service, restarts the service, verifies the provisioning via
the backend log, and finally prints the clear-text API-key for use as HSADMINNG_API_KEY
(see below).
For a local server, do the same steps by hand: generate the API-key, configure just its hash in the environment, then start the application:
# generate an API-key embedding the subject name; keep it secret, it exists only at the client:
apiKey=$(tools/api-key-generate hsadminng.provisioning.key); echo "$apiKey"

# configure just its hash in the environment, then start the application:
export HSADMINNG_PROVISIONING_API_KEY_SHA256=$(tools/api-key-hash "$apiKey")
Using an API-key
Clients send the clear-text API-key in the Hostsharing-Api-Key header. The HTTP function
from .aliases adds that header implicitly from HSADMINNG_API_KEY, if HSADMINNG_JWT_BEARER
is not set (no LOGIN needed). The APIKEY function takes care of both: it stores the key
GPG-encrypted in the git-ignored .apikeys.gpg file and unsets the JWT so the API-key takes
effect (run APIKEY --help for all subcommands and details; LOGOUT drops the active identity,
LOGIN switches back to a JWT):
APIKEY provisioning   # asks for the API-key just once, then stores it in `.apikeys.gpg`
HTTP GET /api/hs/accounts/current   # shows the API_KEY subject and its global-admin flag
The .apikeys.gpg file keeps a section per Keycloak environment, identified by
HSADMINNG_KEYCLOAK_ISSUER (same default as tools/jwt-login), so keys of different
environments with the same name (e.g. provisioning) do not clash:
[https://login.ng.hostsharing.net/realms/hs]
provisioning=hsak_...
keycloak_sync=hsak_...
Keys are only ever stored GPG-encrypted, by default to your own key
(gpg --default-recipient-self); to target a specific key, set
HSADMINNG_APIKEYS_GPG_RECIPIENT (e.g. in the git-ignored .environment). Reading asks for
your GPG passphrase, which gpg-agent caches. A legacy plain .apikeys file is migrated on
next use.
See also HOWTO: Run the application with a real (OAuth2) JWT-authentication, e.g. Keycloak OIDC.
Creating further API-keys at runtime
Acting as global-admin (via JWT or an existing API-key), create an API_KEY subject; the response contains the generated clear-text API-key exactly once, only its hash gets stored:
HTTP POST /api/rbac/subjects <<EOF
{ "name": "some.key", "type": "API_KEY" }
EOF
An API-key can optionally be created with an expiry timestamp (property
"expiresAt": "2030-01-01T00:00:00Z"); an expired key is rejected with 401 Unauthorized.
Without expiresAt, the key never expires.
Unlike the bootstrapped hsadminng.provisioning.key, API-keys created at runtime start without any
roles and thus can neither see nor change any data yet. Grant the wanted roles to the new
subject, e.g. the global ADMIN role (mind roleIdName, roleName uses the object UUID):
HTTP GET /api/rbac/roles -H "Hostsharing-Assumed-Roles: rbac.global#global:ADMIN" \
    | jq -r '.[] | select(.roleIdName == "rbac.global#global:ADMIN") | .uuid'

HTTP POST /api/rbac/grants \
    -H "Hostsharing-Assumed-Roles: rbac.global#global:ADMIN" <<EOF
{
    "assumed": true,
    "grantedRole.uuid": "<the role uuid from above>",
    "granteeSubject.uuid": "<the uuid of the created API_KEY subject>"
}
EOF
To revoke an API-key, delete its subject; as a safeguard against deleting the wrong subject, the subject's name and type must be repeated as query parameters and are verified against the subject identified by the UUID:
HTTP DELETE "/api/rbac/subjects/<uuid>?name=some.key&type=API_KEY"
This physically deletes the subject together with its grants and its stored API-key hash — the key immediately and permanently stops authenticating.
Restricting an API-key to named endpoint-scopes
An API-key can be restricted to named endpoint-scopes given at creation time; each scope
name maps to a fixed allowlist of HTTP-method+path patterns (defined in the backend enum
ApiKeyScope). A scoped API-key may only call endpoints matched by at least one of its
scopes, everything else responds with 403 Forbidden — an additional fence on top of the
roles granted to the API_KEY subject. An API-key without scopes remains unrestricted.
E.g. for a Keycloak subject synchronization that needs to read and upsert ALL subjects (thus the global ADMIN role, granted manually as shown above), but must not be able to use any other endpoint:
HTTP POST /api/rbac/subjects <<EOF
{
  "name": "subject.sync.key", "type": "API_KEY",
  "scopes": ["rbac.subjects:sync"]
}
EOF
And for an API-key for a global-admin but just with read-only access:
HTTP POST /api/rbac/subjects <<EOF
{ "name": "readonly.key", "type": "API_KEY", "scopes": ["*:read"] }
EOF
Scopes only restrict, they never grant anything: also a scoped API-key starts without any roles and needs them granted manually, as shown above.
The available scopes and the endpoints they allow can be listed via GET /api/rbac/scopes.
Every API-key can inspect its own properties (subject, endpoint-scopes, and expiry
timestamp) via GET /api/rbac/context, which is always allowed, even for scoped API-keys.
The scenario-test reports in order range 96xx (generated into build/scenario-reports by
gw scenarioTest, converted to HTML under build/reports/scenarios) document these workflows
with concrete requests and responses.
PostgreSQL Server
You could use any PostgreSQL Server (version 15) installed on your machine.
You might amend the port and user settings in src/main/resources/application.yml, though.
But the easiest way to run PostgreSQL is via Docker.
Initially, pull an image compatible to the current PostgreSQL version of Hostsharing:
docker pull postgres:17.7-trixie
⚠ If we switch the version, please also amend the documentation as well as the aliases file. Thanks!
Create and run a container with the given PostgreSQL version:
docker run --name hsadmin-ng-postgres -e POSTGRES_PASSWORD=password -p 5432:5432 -d postgres:17.7-trixie

# or via alias:
pg-sql-run
To check if the PostgreSQL container is running, the following command should list a container with the name "hsadmin-ng-postgres":
docker container ls
Stop the PostgreSQL container:
docker stop hsadmin-ng-postgres
# or via alias: pg-sql-stop
Start the PostgreSQL container again:
docker container start hsadmin-ng-postgres
# or via alias: pg-sql-start
Remove the PostgreSQL container:
docker rm hsadmin-ng-postgres

# or via alias:
pg-sql-remove
To reset to a clean database, use:
pg-sql-stop; pg-sql-remove; pg-sql-run

# or via alias:
pg-sql-reset
After the PostgreSQL container is removed, you need to create it again as shown in "Create and run ..." above.
Given the container is running, to create a backup in ~/backup, run:
docker exec -i hsadmin-ng-postgres /usr/bin/pg_dump --clean --create -U postgres postgres | gzip -9 > ~/backup/hsadmin-ng-postgres.sql.gz

# or via alias:
pg-sql-backup >~/backup/hsadmin-ng-postgres.sql.gz
Again, given the container is running, to restore the backup from ~/backup, run:
gunzip --stdout --keep ~/backup/hsadmin-ng-postgres.sql.gz | docker exec -i hsadmin-ng-postgres psql -U postgres -d postgres

# or via alias:
pg-sql-restore <~/backup/hsadmin-ng-postgres.sql.gz
Markdown
To generate the TOC (Table of Contents), a little bash script from a Blog Article was used.
Given this is in PATH as md-toc, use:
md-toc <README.md 2 4 | cut -c5-
To render the Markdown files, especially to watch embedded PlantUML diagrams, you can use one of the following methods:
Render Markdown embedded PlantUML
Can you see the following diagram right in your IDE? I mean a real graphic diagram, not just some markup code.
@startuml
me -> you: Can you see this diagram?
you -> me: Sorry, I don't :-(
me -> you: Install some tooling!
@enduml
If not, you need to install some tooling.
for IntelliJ IDEA (or derived products)
You just need the bundled Markdown plugin enabled and install and activate the PlantUML plugin in its settings.
You might also need to install Graphviz on your operating system. For Debian-based Linux systems this might work:
sudo apt install graphviz
Ubuntu Linux command line
- Install Pandoc with some extra libraries:
sudo apt-get install pandoc texlive-latex-base texlive-fonts-recommended texlive-extra-utils texlive-latex-extra pandoc-plantuml-filter
- Install mermaid-filter, e.g. this way:
npm install -g mermaid-filter
- Run Pandoc to generate a PDF from a Markdown file with PlantUML and Mermaid diagrams:
pandoc --filter mermaid-filter --filter pandoc-plantuml rbac.md -o rbac.pdf
for other IDEs / operating systems
If you have figured out how it works, please add instructions above this section.
Render Markdown Embedded Mermaid Diagrams
The source of the RBAC role diagrams is much easier to read with Mermaid than with PlantUML or GraphViz; that's also the main reason Mermaid is used.
Can you see the following diagram right in your IDE? I mean a real graphic diagram, not just some markup code. @startuml me -> you: Can you see this diagram? you -> me: Sorry, I don't :-( me -> you: Install some tooling! @enduml
graph TD;
    A[Can you see this diagram?];
    A --> yes;
    A --> no;
    no --> F[Follow the instructions below!]
    F --> yes
    yes --> E[Then everything is fine.]
If not, you need to install some tooling.
for IntelliJ IDEA (or derived products)
- Activate the bundled JetBrains Markdown PlantUML Extension via File | Settings | Languages & Frameworks | Markdown
- Install the JetBrains Mermaid plugin: https://plugins.jetbrains.com/plugin/20146-mermaid, it also works embedded in Markdown files.
Now the above diagram should be rendered.
for other IDEs / command-line / operating systems
If you have figured out how it works, please add instructions above this section.
IDE-Specific Settings
IntelliJ IDEA
Build Settings
Go to Gradle Settings and select "Build and run using" and "Run tests using" both to "gradle".
Otherwise, settings from build.gradle.kts, like compiler arguments, are not applied when compiling through IntelliJ IDEA.
Annotation Processor
Go to Annotations Processors and activate annotation processing. Otherwise, IntelliJ IDEA can't see Lombok generated classes and will show false errors (missing identifiers).
Suggested Plugins
Other Tools
jq: a JSON formatter.
On Debian'oid systems you can install it with sudo apt-get install jq.
Quick PR Quality Check
pr-quick-check runs inexpensive local quality checks before a pull request is reviewed.
With .envrc loaded by direnv, the tool is available on PATH.
Run the quick check from the repository root:
pr-quick-check
For more details and options, run:
pr-quick-check --help
The same check runs at the end of the CI build via the Gradle task prQuickCheck, which .gittally.yml appends as the last task of the build command; a failing check fails the build.
CI Build-Server
The CI build runs on GitTally, configured by .gittally.yml in the repository root.
To set up the build on a new Hostsharing container server, see doc/ci-build-server-setup.md.
Running the SQL files
For RBAC
The Schema is automatically created via Liquibase, a database migration library. Currently, also some test data is automatically created.
To increase the amount of test data, increase the number of generated customers in 2022-07-28-051-hs-customer.sql and run that
If you already have data, e.g. for customers 0..999 (thus with reference numbers 10000..10999) and want to add another 1000 customers, amend the for loop to 1000...1999 and also uncomment and amend the CONTINUE WHEN or WHERE conditions in the other test data generators, using the first new customer reference number (in the example that's 11000).
For Historization
The historization is not yet integrated into the Liquibase-scripts. You can explore the prototype as follows:
- start with an empty database (the example tables are currently not compatible with RBAC),
- then run
historization.sqlin the database, - finally run
examples.sqlin the database.
Coding Guidelines
Directory and Package Structure
General Directory Structure
.aiassistant/rules/hsadmin-ng.md
Symbolic link to AGENTS.md for IntelliJ IDEA AI Chat project rules.
.aliases
Shell-aliases for common tasks.
AGENTS.md
Canonical project guidance for AI coding agents.
build/
Output directory for Gradle build results. Ignored by git.
build.gradle.kts
Gradle build-file (Kotlin-Script). Contains dependencies and build configurations.
CLAUDE.md
Claude agent wrapper which imports AGENTS.md.
CONVENTIONS.md
Coding conventions for use by an AI agent.
doc/
Contains project documentation.
.editorconfig
Rules for indentation etc. considered by many code editors.
etc/
Miscellaneous configurations, as long as these don't need to be in the rood directory.
.git/
Git repository. Do not temper with this!
.gitattributes
Git configurations regarding text file format conversion between operating systems.
.gitignore
Git configuration regarding which files and directories should be ignored (not checked in).
.gradle/
Config files created by gradle wrapper. Ignored by git.
gradle/
The Gradle distribution downloaded by gradle wrapper. Ignored by git.
gradlew and gradlew.bat use these batches to run Gradle for builds etc.
.idea/ (optional)
Config and cache files created by IntelliJ IDEA. Ignore by git.
.junie/guidelines.md
Junie guidelines file pointing Junie to AGENTS.md.
LICENSE.md
Contains the license used for this software.
out/ (optional)
Build output created by IntelliJ IDEA. Ignored by git.
README.md
Contains an overview about how to build the project and the used tools.
.run/ (optional)
Created by IntelliJ IDEA to contain run and debug configurations.
settings.gradle
Configuration file for Gradle.
sql/
Contains SQL scripts for experiments and useful tasks.
Most of this will sooner or later be moved to Liquibase scripts.
src/
The actual source-code, see Source Code Package Structure for details.
tools/
Some shell-scripts to useful tasks.
Source Code Package Structure
For the source code itself, the general standard Java directory structure is used, where productive and test code are separated like this:
src
    main/
        java/
            net.hostsharing.hasadminng/
        resources/

    test/
        java/
            net.hostsharing.hasadminng/
        resources/
The Java package structure below contains:
- config and global (utility) packages, these should not access any other packages within the project
- rbac, containing all packages related to the RBAC subsystem
- hs, containing Hostsharing business object-related packages
Underneath of rbac and hs, the structure is business-oriented, NOT technical / layer-oriented.
Some of these rules are checked with ArchUnit unit tests.
Run Tests from Command Line
Run all unit-, integration- and acceptance-tests that have not yet been passed with the current source code:
gw test # uses the current environment, especially HSADMINNG_POSTGRES_JDBC_URL
If the referenced database is not empty, the tests might fail.
To explicitly use the Testcontainers-environment, run:
gw-test # uses the environment from .tc-environment
Force running all tests:
gw-test --rerun
To find more options about running tests, try howto test.
Spotless Code Formatting
Code formatting for Java is checked via spotless. To apply formatting rules, use:
gw-spotless
The Gradle task spotlessCheck is also included in gw build and gw check,
thus if the formatting is not compliant to the rules, the build is going to fail.
JaCoCo Test Code Coverage Check
This project uses the JaCoCo test code coverage report with limit checks. It can be executed with:
gw jacocoTestReport
This task is also automatically run after gw test.
It is configured in build.gradle.kts.
A report is generated under build/reports/jacoco/tests/test/index.html.
Additionally, quality limits are checked via:
gw jacocoTestCoverageVerification
This task is also executed as part of gw check.
PiTest Mutation Testing
PiTest mutation testing is configured for unit tests. It can be executed with:
gw pitest
Classes to be scanned, tests to be executed and thresholds are configured in build.gradle.kts.
A report is generated under build/reports/pitest/index.html.
A link to the report is also printed after the pitest run.
Remark
In this project, there is a large amount of code is in plsql, especially for RBAC. Java is mostly used for mapping and validating REST calls to database queries. This mapping is mostly done through Spring annotations and other implicit code.
Therefore, there are only few unit tests and thus mutation testing has limited value. We'll see if this changes when the project progresses and more validations are added.
OWASP Security Vulnerability Check
An OWASP security vulnerability check is configured. It can use two vulnerability sources: the NVD and the Sonatype OSS-Index.
The NVD (National Vulnerability Database) is required.
Fetch an API key from https://nvd.nist.gov/developers/request-an-api-key
and add it to your ~/.gradle/gradle.properties file:
OWASP_API_KEY=........-....-....-....-............
Now you can run the dependency vulnerability check:
gw dependencyCheckUpdate
gw dependencyCheckAnalyze
This task is also included in gw build and gw check.
It is configured in hsadmin.quality.gradle.kts.
The Sonatype OSS-Index is an optional second source.
It rejects anonymous requests with HTTP 401 Unauthorized, which fails the whole analysis.
Therefore, the OSS-Index analyzer stays switched off until you configure credentials for it.
To switch it on, register a free account at https://ossindex.sonatype.org/user/register,
copy your API token from https://ossindex.sonatype.org/user/settings
and add both values to your ~/.gradle/gradle.properties file:
OSSINDEX_USERNAME=your-account@example.org
OSSINDEX_API_TOKEN=................................
Often vulnerability reports don't apply to our use cases. Therefore, reports can be suppressed. In case of suppression, a note must be added to explain why it does not apply to us.
See also: https://jeremylong.github.io/DependencyCheck/dependency-check-gradle/index.html.
How to Check Dependency-License-Compatibility
The gw check phase depends on a dependency-license-compatibility check.
If any dependency violates the configured list of allowed licenses, the build will fail.
New licenses can be added to that list after a legal investigation.
⚠ GPL (GNU General Public License) is only allowed with a classpath exception. Do not use any dependencies under GPL without this exception, except if these offer an alternative license, which is allowed. LGPL (GNU Library General Public License) is also allowed.
To run just the dependency-license-compatibility check, use:
gw checkLicense
If the check fails, a report can be found here: The generated license can be found under dependencies-without-allowed-license.json.
And to generate a report, use:
gw generateLicenseReport
The generated license can be found here: index.html.
More information can be found on the project's website.
How to Upgrade Versions of Dependencies
Dependency versions can be automatically upgraded to the latest available version:
gw useLatestVersions
Afterward, gw check is automatically started.
Please only commit+push to master if the check run shows no errors.
More information, e.g. on blacklists see on the project's website.
Biggest Flaws in our Architecture
The RBAC System is too Complicated
Now, where we have a better experience with what we really need from the RBAC system, we have learned that it creates too many (grant- and role-) rows and too even tables which could be avoided completely.
The basic idea is to always have a fixed set of ordered role-types which apply for all DB-tables under RBAC;
e.g. OWNER>ADMIN>AGENT[>PROXY?]>TENENT>REFERRER.
Grants between these for the same DB-row would be implicit by order comparison.
This way we would get rid of all explicit grants within the same DB-row
and would not need the rbac.role table anymore.
We would also reduce the depth of the expensive recursive CTE-query.
This has to be explored further. For now, we just keep it in mind and avoid roles+grants which would not fit into a simplified system with a fixed role-type-system.
The Mapper is Error-Prone
Where org.modelmapper.ModelMapper reduces bloat-code a lot and has some nice features about recursive data-structure mappings,
it often causes strange errors which are hard to fix.
E.g. the uuid of the target main object is often taken from an uuid of a sub-subject.
(For now, use StrictMapper to avoid this, for the case it happens.)
Too Many Business-Rules Implemented in Controllers
Some REST-Controllers implement too much code for business-roles. This should be extracted to services.
How To ...
Besides the following How Tos you can also find several How Tos in the source code:
grep -r HOWTO src
also try this (assumed you've sourced .aliases):
howto
How to Build the Executable Jar
For normal development and test runs, build.time is omitted from
META-INF/build-info.properties so Gradle can keep test tasks up to date.
To build the final executable Spring Boot jar with build.time included, use:
gw bootJarWithBuildTime
This wraps bootJar and sets the build-time flag automatically.
How to Build the Executable Jar With Documentation
The jar can carry the project documentation, which the application then serves at /doc/index.html:
selected business documentation, the generated RBAC diagrams, the scenario-test reports and the
REST API per module, plus a ZIP of all of it for download.
gw bootJarWithDocumentation
Every plain bootJar already bundles the Markdown sources; this task additionally renders them to
HTML and needs the tooling of the Dockerfile.
See doc/README.md for what it contains, how to add a document, and how the REST API documentation is served.
How to Run the Application With Other Profiles, e.g. production:
Add --args='--spring.profiles.active=... with the wanted profile selector:
gw bootRun --args='--spring.profiles.active=external-db,only-prod-schema,without-test-data'
These profiles mean:
- external-db: an external PostgreSQL database is used with the PostgreSQL users already created as specified in the environment
- only-prod-schema: only the Office module is started, but neither the Booking nor the Hosting modules
- without-test-data: no test-data is inserted
How to Run the Application in a Debugger
Add '-- --debug-jvm to the command line ('...' stands any other args).
The --debug-jvm is a so-called *Gradle side knob, which goes outside of the --args="..." application arguments,
thus we separate it by --; this is treated by the gw-bootRun alias.
gw-bootRun ... -- --debug-jvm
In the very beginning, the application is going to wait for a debugger with a message like this:
Listening for transport dt_socket at address: 5005
As soon as a debugger connects to that port, the application will continue to run.
In IntelliJ IDEA you need a 'Remote JVM Debug' run configuration like this:
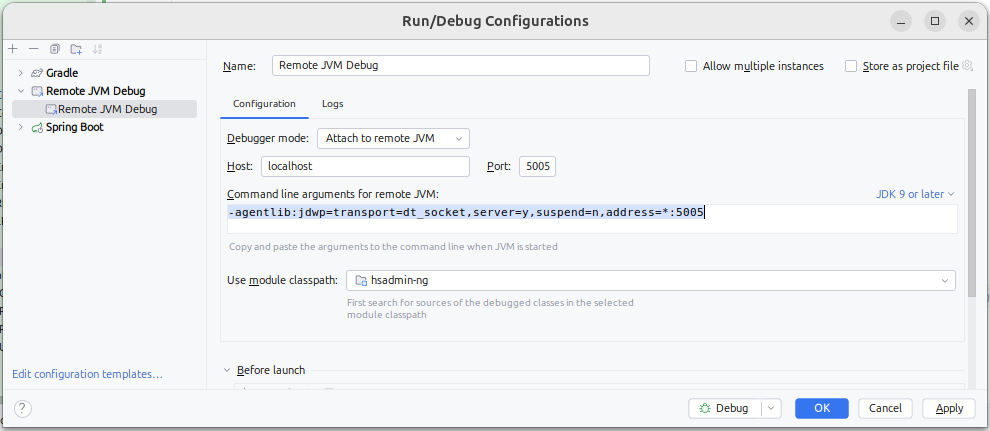
Now, to attach IntelliJ IDEA as a debugger, you just need to run that config in debug mode. If it's selected, just hit the bug-symbol next to it.
How to Do a Clean Run of the Application
If you frequently need to run with a fresh database and a clean build, you can use this:
# replace `gw bootRun` by the proper command as described above
gw clean && pg-sql-reset && sleep 5 && gw bootRun' 2>&1 | tee log
How to Configure .pgpass for the Default PostgreSQL Database?
To access the default database schema as used during development, add this line to your .pgpass file in your users home directory:
localhost:5432:postgres:postgres:password
Amend host and port if necessary.
How to Run the Tests Against a Local User-Space Podman Daemon?
Using a normal Docker daemon running as root has some security issues. As an alternative, this chapter shows how you can run a Podman daemon in user-space.
Install and Run Podman
You can find directions in this project on GitHub
Summary for Debian-based Linux systems:
- Install Podman, e.g. like this:
sudo apt-get -y install podman
It is possible to move the storage directory to /tmp, e.g. to increase performance or to avoid issues with NFS mounted home directories:
cat .config/containers/storage.conf
[storage]
driver = "vfs"
graphRoot = "/tmp/containers/storage"
- Then start it like this:
systemctl --user enable --now podman.socket
systemctl --user status podman.socket
ls -la /run/user/$UID/podman/podman.sock
These commands are also available in .aliases as podman-start.
Use the Command Line to Run the Tests Against the Podman Daemon
- In a local shell. in which you want to run the tests, set some environment variables:
export DOCKER_HOST="unix:///run/user/$UID/podman/podman.sock"
export TESTCONTAINERS_RYUK_DISABLED=true
These commands are also available in .aliases as podman-use.
Disabling RYUK is necessary, because it's not supported by Podman. Supposedly this means that containers are not properly cleaned up after test runs, but I could not see any remaining containers after test runs. If we are running into problems with stale containers, we need to register a shutdown-hook in the test source code.
- Now You Can Run the Tests
gw test # gw is from the .aliases file
Use IntelliJ IDEA Run the Tests Against the Podman Daemon
To run the tests against a Podman Daemon in IntelliJ IDEA too, you also need to set the environment variables DOCKER_HOST and TESTCONTAINERS_RYUK_DISABLED as show above.
This can either be done in the environment from which IDEA is started.
Or you can use the run config template for gradle to set these variables:
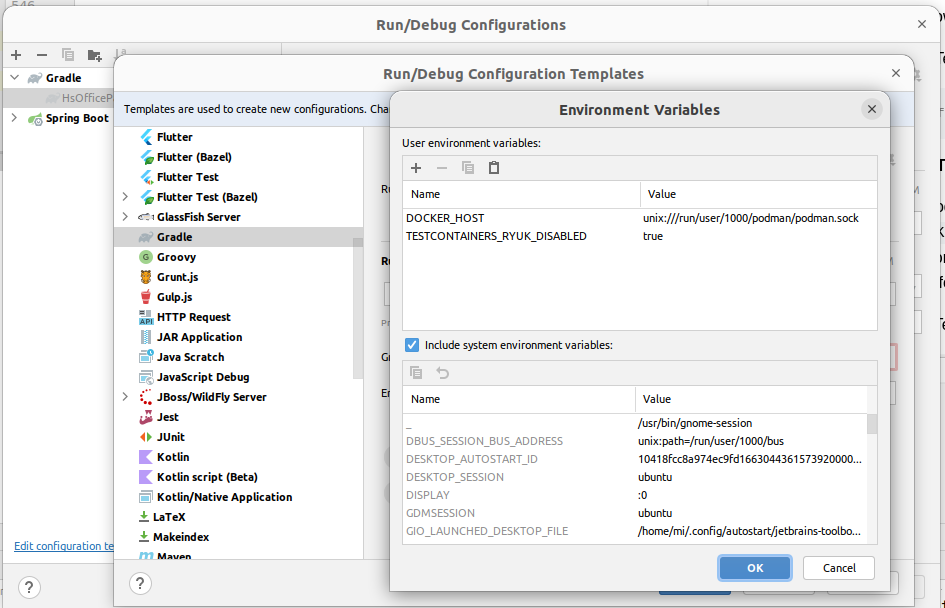
If you already have Gradle run configs, you need to delete them, so they get re-created from the template. Alternatively you need to add the environment varibles here too:
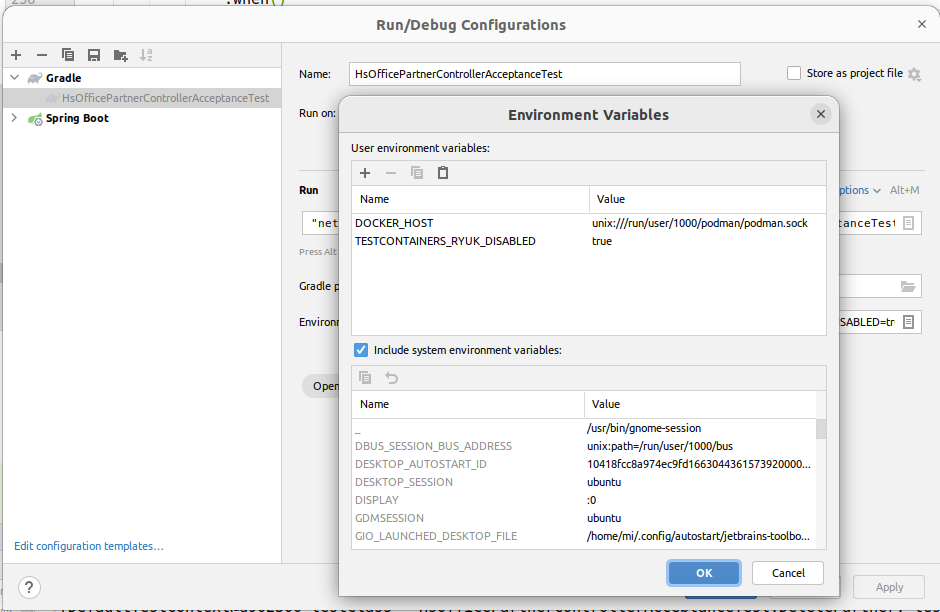
Find more information here.
~/.testcontainers.properties
It should be possible to set these environment variables in ~/.testcontainers.properties,
but it did not work so far.
Maybe a problem with quoting.
If you manage to make it work, please amend this documentation, thanks.
How to Run the Tests Against a Remote Podman or Docker Daemon?
- On the remote host, you need to have a Podman or Docker daemon running on a port accessible from the Internet. Probably, you want to protect it with a VPN, but that's not part of this documentation.
e.g. to make Podman listen to a port, run this:
podman system service -t 0 tcp:HOST:PORT # please replace HOST+PORT
- In a local shell. in which you want to run the tests, set some environment variables:
export DOCKER_HOST=tcp://HOST:PORT # please replace HOST+PORT again
export TESTCONTAINERS_RYUK_DISABLED=true  # only for Podman
Regarding RYUK, see also in the directions for a locally running Podman, above.
- Now you can run the tests:
gw clean test # gw is from the .aliases file
For information about how to run the tests in IntelliJ IDEA against a remote Podman daemon, see also in the chapter above just with the HOST:PORT-based DOCKER_HOST.
How to Run the Application on a Different Port?
By default, gw bootRun starts the application on port 8080.
This port can be changed in
src/main/resources/application.yml through the property server.port.
Or on the command line, add --server.port=... to the --args parameter of the bootRun task, e.g.:
gw bootRun --args='--spring.profiles.active=dev,fake-jwt,complete,test-data --server.port=8888'
or, for local development, simply:
gw-bootRun 8888
How to Use a Persistent Database for Integration Tests?
Usually, the DataJpaTest integration tests run against a database in a temporary docker container.
As soon as the test ends, the database is gone; this might make debugging difficult.
Alternatively, a persistent database could be used by amending the
resources/application.yml through the property spring.datasource.url in src/test/resources/application.yml , e.g. to the JDBC-URL from src/main/resources/application.yml.
If the persistent database and the temporary database show different results, one of these reasons could be the cause:
- You might have some changesets only running in either context,
check the
context: ...in the changeset control lines. - You might have changes in the database which interfere with the tests,
e.g. from a previous run of tests or manually applied.
It's best to run
pg-sql-reset && gw bootRunbefore each test run, to have a clean database.
How to Generate Demo Data?
Every CI build generates five customers in a Testcontainers-scoped PostgreSQL database, while running the tests. Therefore, demo-data generation gets tested with each build.
A larger dataset needs a persistent database, because the Testcontainers database of a test run disappears with it. How to set one up, generate a dataset, run the application against it, and hand it over as a dump, is described in Generating and Working With Demo Datasets. The concept and the reasons behind it are in RFC#0005.
How to Amend Liquibase SQL Changesets?
Liquibase changesets are meant to be immutable and based on each other. That means, once a changeset is written, it never changes, not even a whitespace or comment. Liquibase is a database migration tool, not a database initialization tool.
This, if you need to add change a table, stored procedure or whatever,
create a new changeset and apply ALTER, DROP, CREATE OR REPLACE or whatever SQL commands to perform your changes.
These changes will be automatically applied once the application starts up again.
This way, any staging or production database will always match the application code.
But, during initial development that can be a big hassle because the database structure changes a lot at that stage. Also, the actual structure of the database won't be easily recognized anymore through lots of migration changesets.
Therefore, during initial development, it's a good approach just to amend the existing changesets and delete the database:
pg-sql-reset
gw bootRun # with the proper command line arguments
⚠ Just don't forget switching to the migration mode, once there is a production database!
How to Re-Generate Spring-Controller-Interfaces from OpenAPI specs?
The API is described as OpenAPI specifications in src/main/resources/api-definition/.
Once generated, the interfaces for the Spring-Controllers can be found in build/generated/sources/openapi.
These interfaces have to be implemented by subclasses named *Controller.
All Gradle tasks that need the generated interfaces depend on the Gradle task openApiGenerate which controls the code generation.
It can also be executed directly:
gw openApiGenerate
How to Jump to API-endpoint OpenAPI spec and Spring-REST-controller implementation
If you're looking for the spec and implementation if an API REST-endpoint,
you can use the alias api which utilizes the script tools/api as follows:
api GET /api/hs/office/contacts # long form
api /api/hs/office/contacts # defaults to GET
api contacts # short form
This prints a list of matching endpoints and for each endpoint a link to the related OpenAPI spec and the controller implementation.
How to Generate Database Table Diagrams?
Some overview documentation about the database can be generated via postgresql_autodoc.
To make it easier, the command line is included in the .aliases, just call:
postgres-autodoc
The output will list the generated files.
How to Add (Real) Admin Users
DO $$
DECLARE
    -- replace with your admin account names
    admin_users TEXT[] := ARRAY['admin-1', 'admin-2', 'admin-3'];
    admin TEXT;
BEGIN
    -- run as superuser
    call base.defineContext('adding real admin users', null, null, null);

    -- for all new admin accounts
    FOREACH admin IN ARRAY admin_users LOOP
        call rbac.grantRoleToSubjectUnchecked(
                rbac.findRoleId(rbac.global_ADMIN()), -- granted by role
                rbac.findRoleId(rbac.global_ADMIN()), -- role to grant
                rbac.create_subject(admin)); -- creates the new admin account
        END LOOP;
END $$;
How to Use aider AI - Pair Programming in Your Terminal
aider is an open source AI agent in the shape of a command-line tool that lets you code with large language models (LLMs) OpenAI GPT, Claude Sonnet or Google Gemini. It allows you to easily analyze and edit files by chatting with the AI.
BEWARE: aider is going to send your source code to the LLM!
hsadmin-NG is open source, so this is not a big problem. For more information about security regarding aider, please have a look at the end of this chapter and check out the aider privacy policy.
Installation
Assuming you have Python 3 and pipx installed (a tool to install and run Python applications in isolated environments), you can install aider-chat like this:
pipx install aider-chat
If you want to use specific features like OpenAI's vision capabilities, you might need to add the following dependencies:
pipx inject aider-chat openai --include-apps
To add support for Google's Gemini AI, you can add the google-generativeai package:
pipx inject aider-chat google-generativeai --include-apps
Configuration
aider requires an API key for the AI model you want to use.
E.g. for OpenAI GPT, set the OPENAI_API_KEY environment variable:
export OPENAI_API_KEY="your-api-key-here"
And e.g. for Google Gemini, set the GEMINI_API_KEY environment variable:
export GEMINI_API_KEY="your-api-key-here"
You might want to add this to your shell's startup file (e.g., .bashrc, .zshrc).
Usage
- Navigate to your project's root directory in the terminal.
- Start
aiderby simply typing:aider - Add the files you want the AI to work with:
/add path/to/your/file.java path/to/another/file.py - Start chatting! Describe the changes you want, ask questions, or request code generation.
aiderwill propose changes and apply them directly to your files after your confirmation. - Use
/quitto exitaider.
Refer to the official aider documentation for more commands and advanced features.
Example Session
Aider is not yet very good at figuring out which files to amend in a large code base.
I tried giving hints with /ask, but it was always missing too many files.
With some of my approaches, it even wanted to create new files, which is not necessary for this task.
I even tried with other language models, like gpt-o4 or r1 (deepseek-reasoning), no success. Maybe somebody else can figure it out, or it gets better with time?
For now, I just determined the files myself.
As I knew that the new filed needs to be supported everywhere,
where the existing field registrationOffice occurs, I could simply use grep:
aider `grep -rl registrationOffice src/main/java/ src/test/java/ src/main/resources/api-definition src/main/resources/db/`
Then I requested my change to the aider AI chat:
I want to add a text field
notesto the database tablehs_office.partner_detailsand related files. Files to amend have already been added to aider AI. Please apply all required changes for Java production+test-code, add the Liquibase changeset and amend the OpenAPI-Spec.
I ran the tests and found that patching the partner details did not work. So, I told the aider AI about it:
Please doublecheck if you followed all conventions. Any other amendments necessary to support the new field
notesin the partner details?
Then I saw that aider AI did add some notes to the test data, but not to the assertions. I decided that the changes in the test-data are not necessary and reverted thos files using git.
Now, all tests passed.
Try it yourself, but keep in mind that LLMs use a concept called temperature which specifies a level of randomness. This means you might get different results.
Security
To reassure myself which files aider AI accesses, I checked this with strace:
# run aider under strace:
strace -f -t -e trace=file -o build/aider.strace aider ...

# and in another terminal check the strace log:
tail -f build/aider.strace | grep -oP '"\K[^\n"]+(?=")'
At the time I've checked it, all accessed files made sense. Of course, as with any locally installed application, there is no guarantee.
There is a Docker image for aider AI, but it's pretty restricted and to be able to use some features, you'd need to rebuild the image.
Further Documentation
- the
docdirectory contains architecture concepts and a glossary - doc/environment-variables.md lists all environment variables
(backend,
HTTP/LOGIN/APIKEYshell functions,tools/remote, tests and build), where they are loaded from, and their defaults - the
ideasdirectory contains unstructured ideas for future development or documentation